o frabjous day!

books, recipes, parenting & other things

About

Cool Links

  • These delicious, lightly sweet muffins are perfect for breakfast or morning tea, have a million variations to be experimented with, and are delicious on their own, or spread with butter, depending on your taste for decadence. Another recipe from the excellent Diana Linfoot’s Muffin Magic.

    3 eggs
    1/2 cup sugar or honey
    1/2 vegetable oil
    1 cup plain yoghurt or sour cream
    1 cup grated carrot
    1/2 raisins
    3 cups self raising flour
    1/2 tsp baking soda
    1 tsp cinnamon

    Preheat the oven to 200C, and grease or line the muffin pan.

    Beat together the eggs, sugar, oil and yoghurt. Add the carrot and raisins. Gently, as delicately as possible, fold in the flour, baking soda and cinnamon.

    Spoon the mixture into the muffin tin. I shook some cinnamon sugar over the top of each muffin before putting them in the oven for 20-25 minutes.

    Variations – walnuts, sultanas or currants instead of raisins, or try grated zucchini instead of carrot.

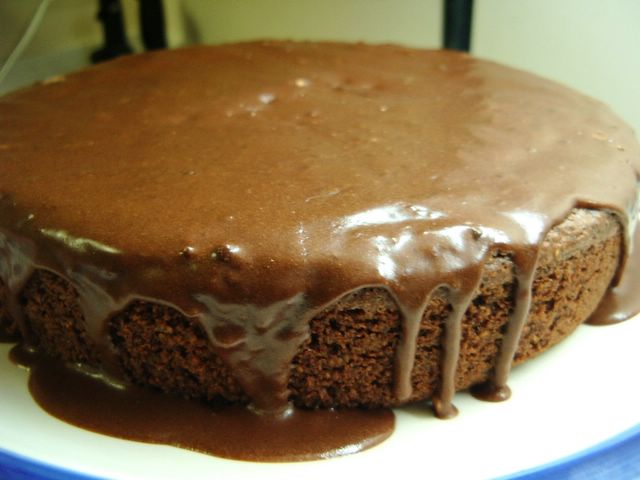
  • This is another wonderful Nigella Lawson chocolate cake recipe – this one’s from the “Chocolate Cake Hall of Fame” chapter in Feast. It’s a dense, yet surprisingly light, loaf cake – not too light, however, and it goes wonderfully with cream. It’s a sweet chocolate cake, and you could make it sweeter by using milk, or perhaps even white, chocolate chips instead of dark. It’s an extremely simple recipe – it’s designed to be made in a blender, although I beat it together by hand. Once it’s cooked, you pour over some chocolate syrup, and then when cold, grate over some chocolate sprinkles for a rather elegant loaf cake. I served it for morning tea, and it was extremely popular – afternoon tea might be more appropriate though. As with most Nigella recipes, it’s rather rich.

    200g plain flour
    1/2 tsp bicarb of soda
    50g cocoa
    275g caster sugar
    175g butter
    2 eggs
    1 tablespoon vanilla extract
    80ml sour cream
    125ml boiling water
    175g chocolate chips

    for the syrup:
    1 tsp cocoa
    125ml water
    100g caster sugar
    25g dark chocolate

    Preheat the oven to 170C. Grease and line a loaf tin (21 x 11cm and 7.5cm deep).

    Put the flour, bicarb, cocoa, sugar, butter, eggs, vanilla and sour cream into a food processor, and blitzs until it’s a smooth, satiny brown batter. Process again while pouring the boiling water slowly into the mixture. Turn off the processor, and stir in the chocolate chips.

    (If you’re not using a food process, cream the butter and sugar, then beat in the eggs, followed by the dry ingredients, then the sour cream and vanilla, then beat in the water.)

    Pour the batter into the loaf tin, and bake for an hour. When ready, the loaf will be risen and split down the middle, and a skewer should come out fairly clean.

    Just before the cake comes out of the oven, put the syrup ingredients of cocoa, water and sugar into a small saucepan, and boil for five minutes. What you want is a reduced liquid, a syrup.

    When you’ve taken the cake out of the oven, pierce a few times with a skewer, and pour the syrup as evenly as possible over the cake. Let the cake become completely cold, then slip it out of its tin, removing the paper, and place it on your serving plate. Get your chocolate, and slice thin slivers off the block with a heavy knife, until you’ve got enough to cover the top of the cake. If required, spoon a little extra syrup so that the chocolate will stick to the surface.

    And there you have it. Delicious in thick slices with cream or yoghurt.

  • A few weeks ago a friend and I visited Freestyle Dessert Cafe in Rosalie. I just couldn’t go past visiting somewhere that calls itself a ‘Dessert Cafe’.

    We sat outside at a little table in the early spring sunshine, and agonised over the menu for a while, peeking looks at what other people had ordered. Eventually, I decided on a Berry Deluxe Sundae, and R ordered the Chocolate Guinness Cake.

    My sundae, pictured above, was perfect. Rasberry and strawberry sorbet, vanilla icecream, berries at the bottom of the glass, marshmallows, and a spear of chocolate. Light, sweet and delicious – perfect for a spring afternoon.

    R’s Chocolate Guinness Cake was amazing (although I couldn’t detect any taste of stout). It was a rich, smooth velvety chocolate experience, surrounded with an incredible sauce. It was so rich, she couldn’t finish it, and I helpfully polished it off. It was so good, I think I would order a cake next time, rather than a sundae – I’ve had more amazing icecream, but rarely so excellent a cake.

  • Calling these “Strawberry Cupcakes” is a little misleading – they’re actually a plain butter cake, with strawberry flavoured icing. Much tastier than the lemon version below, and much prettier as well. (Soon I’m going to try and make a cupcake that looks more sophisticated, but I’m rather attached to the childish versions at the moment.)

    1/2 cup softened butter
    3/4 cup castor sugar
    1 tsp vanilla essence
    2 eggs
    2 cups self raising flour
    3/4 cup milk
    red food dye

    icing:
    2 cups icing sugar
    water
    red food dye
    strawberry essence flavouring

    Preheat the oven to 180C.

    Beat the butter, sugar, vanilla essence and eggs together until light and fluffy. Add the flour and milk alternately, beating until you have a smooth batter.

    Drip some red food dye into the mixture, and stir delicately, creating swirls of pink in the mixture.

    Spoon into a muffin pan, into paper cases – about 1 big dessert spoonful in each case. Makes 12.

    Bake for 20 minutes.

    For the icing, mix together the sugar, food dye, a few splashes of flavouring and enough water for a fairly stiff icing. When the cakes have cooled a little, spoon the icing over them, and if you like, add some hundreds and thousands as soon as you’ve put the icing on, otherwise they won’t stick. Regress to childhood, and eat several, licking the icing off your fingers afterwards.

  • This wasn’t the most attractive or successful cupcake experiment. Not only did I go completely overboard with the icing (doesn’t it remind you of those little crabs at the beach that leave behind swirls of sand?), but the cake itself wasn’t enormously appetising – I grated the lemon rind too roughly, so that each cake was studded with chunky pieces of lemon peel. I’m putting the recipe up here anyway, as I thought the cakes looked rather amusing, and I’m sure it’d be a good basic recipe if the lemon is more finely grated.

    1/2 cup softened butter
    3/4 cup castor sugar
    2 eggs, beaten
    grated rind of 1 lemon
    2 tsp lemon juice
    2 1/4 cups self raising flour
    3/4 cup milk

    icing:
    1/2 cup butter
    4 cups icing sugar
    lemon juice

    Preheat the oven to 180C.

    Beat together the butter and sugar until fluffy. Stir in the eggs, then add the lemon rind and juice. Mix in the flour alternately with the milk.

    Spoon into muffin tins (filled with paper cases) – about one big dessert spoonful per cup. Makes 12.

    Bake for 20 minutes.

    While the cakes are cooling, beat the butter with the icing sugar, and add lemon juice until you get the texture you want. I made mine quite thick, and piped it onto the cupcakes. If you’re not into mountains of icing, I’d reduce the butter, and cut down the sugar by a cup. I dyed my icing with yellow food colouring, although it was quite a pretty pale yellow from the butter originally.

  • I’d never made cupcakes before, but I love the concept of little decorated cakes. Aren’t these cute? Next time I’m going to go for a slightly more adult colour – a deep red, or purple. I got the inspiration for this recipe from this, but changed the recipe to cater to the ingredients I had available. I think any good chocolate cake recipe would work well, though.

    1/2 cup butter
    1/2 cup white sugar
    1 1/2 cups brown sugar
    2 teaspoons vanilla
    2 eggs
    2 1/2 cups flour
    1/4 cup cocoa
    2 teaspoons baking soda
    1-1/2 cups milk

    for the icing:
    1/2 cup softened butter
    4 cups icing sugar
    roughly 1/4 cup milk

    Preheat the oven to 180C.

    Cream the butter and sugar together. Beat in the vanilla, eggs and milk until you have a nicely smooth mixture. In fact, the original recipe was done entirely in a food processor, but I couldn’t be bothered getting mine out and then washing it up.

    Gradually add the flour, cocoa and baking soda, stirring throughout to remove lumps.

    Place paper patty cake cases into two muffin tins, and put about 2 big dessert spoonfuls of mixture in each one – this made about 18 cupcakes. Bake for about 30 minutes.

    For the icing, begin beating together the softened butter and icing sugar, gradually adding milk as you go along. Stop adding milk when you get a fairly stiff texture – I made my icing a bit soft, and instead of defined swirls of icing (which was what I was aiming for) it all collapsed into a smooth topping.

    These were delicious – extremely sweet, and very cute.

  • I based these on this recipe, but due to stinginess I used walnuts instead of macadamias. I’m not a big fan of white chocolate, but I had bought a packet of white chocolate chips in the supermarket a few weeks ago, for reasons known only to some obscure part of my brain. So cookies were on the agenda – I thought perhaps I’d enjoy white chocolate more if it was baked into something. I didn’t fall in love with these – one was definitely enough, as I just found the white chocolate too sweet (shocking, I know, that I would find something overly sweet). But they were quite popular at work, and they’re extremely easy to bake.

    1 cup butter, softened
    1 1/2 cups white sugar
    1/2 cups brown sugar, packed
    2 eggs
    1 1/2 teaspoons vanilla essence
    3 cups plain flour
    1/2 teaspoon baking soda
    1 teaspoon salt
    240g white chocolate chips
    1 1/2 cups chopped macadamia nuts or walnuts

    Preheat oven to 180C. Lightly grease cookie trays or line with greaseproof paper.

    Cream the butter and sugars in a large bowl until blended and fluffy. Add the eggs and vanilla, and beat well.

    Blend in flour, baking soda, and salt. This is a stiff mixture, so it’s going to need some serious mixing before it’s all blended together.

    Stir in the white chocolate chips and chopped nuts.

    Roll the dough into small rounds, and squash them onto the prepared trays. Bake for 10 to 12 minutes or until firm. (I always find this step really difficult, judging when to remove them from the oven. These cookies, I found, really do need to be left until the top is dry and firm). Remove to wire racks to cool.

  • This flourless chocolate cake is from a recipe book by Joanne Harris called French Kitchen, which helpfully includes an entire chapter on chocolate, including the chilli hot chocolate referred to in Chocolat. It’s extremely dense and heavy, a sticky feast of a cake, and as you can see from the above picture, very soft. The lines of my wire rack cut into the cake, and the middle fell out and had to be squished in again. I iced it to make it look a little nicer, but it would be just as lovely without icing. Rather than ground almonds, I used ground hazelnuts, which give the cake a much nuttier flavour.

    180g dark chocolate
    175g butter, softened
    1/2 cup sugar
    200g ground almonds
    4 eggs, separated

    Heat the oven to 150C. Line a 25cm cake tin with baking paper.

    Break the chocolate into pieces and melt it in a heatproof bowl over a pan of simmering water.

    Cream together the butter and sugar until soft and creamy. Add the ground almonds, egg yolks and melted chocolate, and beat until evenly blended. Whisk the egg whites until stiff, add to the cake mixture and quickly fold in.

    Pour into cake tin, and bake for 35 minutes. A light crust will form on the top and the middle should still be a little squishy. Leave to cool a little before carefully removing from tin.

  • Forgive the blurriness and general unattractiveness of the above photograph – the camera ran out of batteries at the critical moment. Don’t let it put you off trying this dessert, another recipe from the blonde and buxom Angela. We’ve decided to do a whole Stolen series with recipes from her ex-husband, and this one is certainly delicious. Extremely rich and deliciously creamy. You simply put in the fridge when the layers are constructed, so you can put it together in a convenient tupperware container if you happen to be taking it to work for the masses to eat (I also like this because you can see the cream oozing out between the layers through the plastic).

    2-3 packets of sponge finger biscuits (depending on the size of your container) (the brand I used was Unibic)
    300g dark cooking chocolate
    700g thickened whipping cream
    1 egg yolk
    Frangelico, Brandy, Rum – whatever spirit you prefer
    2 cups milk

    Get the boring bit out of the way first, and whip the cream.

    Now, I had some problems with the chocolate. As you can seen from the above picture, rather than a smooth layer of chocolate, I had a rough layer of little chocolate blobs. However, I didn’t follow Angela’s instructions, so I’ll write them out here as she did.

    In a microwave carefully melt the chocolate. Remove before it has completely melted and whisk in the egg yolk and a generous dollop of whipped cream. You don’t want the consistency to be too runny – you want a smooth cream texture.

    I did mine in a saucepan, added the egg yolk, and the chocolate completely solidified and nothing I could do could smooth the texture. The dessert still tasted gorgeous, but it ruined its looks a little, I think.

    In a bowl, mix together the milk and alcohol. I didn’t measure the Frangelico, and just pour in several big glugs – it wasn’t actually that noticeable in the finished dessert, and in future I’d probably do 1/4 to 1/3 of a cup. Taste the mixture to check the strength.

    One by one, dunk each biscuit in the milk mixture for 1-2 seconds – not longer, or they’ll be too soggy – then place it into the container until you have completely covered the bottom with tight rows of biscuits.

    Smooth a layer of chocolate over the biscuits, and follow this with a layer of whipped cream.

    Repeat the process with another layer of dunked biscuits, chocolate and cream.

    Repeat with another layer of dunked biscuits and chocolate. Refrigerate the dessert, and add a top layer of whipped cream prior to serving. The dessert is at its best if chilled prior to serving. Decorate with chocolate flakes if you wish.

  • You know how sometimes, you just feel like a hot dog or four? It’s nice when you can cycle down to the shops and get the ingredients to fulfil that craving right away. I never buy hot dogs – they’re not all that readily available as fast food, being much more of an American thing. I have no idea what Americans put in their hot dogs, so perhaps it would be best to term this an Australian hot dog.

    So, hop down to the shops and get yourself some frankfurts. May I suggest that you don’t get the super cheap Bi-Lo frankfurts, as we did, because they had a bit of an ikky chemical aftertaste, which hit only after you’d consumed them and they were making the exciting trip through your digestive system.

    Once you’ve made the decision on frankfurts, grab some hot dog buns, bacon, onion and cheese, and head home again.

    Boil the frankfurts, and while they’re heating, fry the bacon and onion together. Grate some cheese. Slice the buns in half and assemble the hot dogs thus: frankfurt, onion, strip of bacon and grated cheese. Put the assembled hot dogs on a tray and pop them under the grill until the cheese is melted and the bun is crispy. Decorate artistically with swirls of tomato sauce, and eat immediately.