• I have a cheap slow cooker that I bought at one point and have rarely used – it sits gathering dust in the pantry. Well, it used to – no longer! It is now a ridiculously large and unwieldy yoghurt maker. I’ve made yoghurt twice, based on this method of making it in a slow cooker. It is terribly satisfying, mostly because I had previously thought of making yoghurt without a special yoghurt maker a very tricky process not to be attempted by someone as slapdash in the kitchen as me.

    ingredients:
    a dusty, unused slow cooker
    2 litres of milk (full cream milk, because why bother to have milk at all if you’re having low fat)
    1/2 cup plain yoghurt or a powdered yoghurt culture

    At around 4pm, pour the milk into your slow cooker, and turn it on high. Wander off. Do not forget about the milk and leave it boiling overnight, otherwise it turns into a weird caramelised brown mass which is really hard to remove. Yes, I do know this from experience.

    Around 2 hours later, check on the milk – you’re aiming to have it at around 83C, or just steaming away just below boiling if you’re not using a thermometer. Turn off the slow cooker, and remove the lid to let the milk cool down for between 1 to 2 hours. You want it at around 43 degrees, or quite warm to the touch.

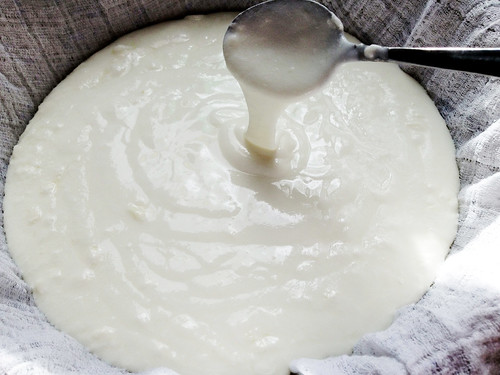
    Stir in the yoghurt or culture. Replace the lid, and wrap the whole slow cooker in a towel to insulate it. Cram it back into the pantry, and go to bed.

    In the morning, check the yoghurt – it should be reasonably thick. You can transfer it into a container and into the fridge from there if you want a fairly thin natural yoghurt. If you want more of a greek yoghurt texture, put a colander over a bowl in your sink, and cover the colander with a bit of muslin – say, by stealing one of your baby’s clean muslin wraps. Pour the yoghurt into the colander, and let it sit there straining for about two hours. Spoon it from there into your container – having let it strain, you should have just over 1 litre of thick yoghurt.

    Save the whey – there’s all sorts of uses for it in the kitchen, or you can put it on your compost or pot plants.

  • Remember how I declared I had a marvellous project to make 50 new recipes this year? Well, I was making such good progress that I changed my mind and made it 100. So! You’ll find recipes 1 – 9 here, and below are 10 through 17:

    10/100: Coffee Braised Beef – adapted from this recipe. I think the chunk of rump I used was not the best cut for this recipe – it wasn’t as melt-in-the-mouth as I would have liked – but I loved the flavour of the coffee with the beef. I increased the coffee to just over a cup and it gave a dark intense flavour to the meat. (I should note the husband wasn’t particularly keen on it.)

    11/100: Maple-Brined Pork Chops – from this recipe. I got a bit distracted and left these in the brine for… I don’t know, perhaps 18 hours rather than the 6 in the recipe. They were a bit too salty as a result, however they were wonderfully moist and flavoursome, and this was a very low effort thing to do with meat prior to grilling it. I definitely want to try the brining technique again, perhaps with chicken.

    12/100: Braised Cabbage & Ham – from this recipe. The husband declared this very bland, but then admitted that he didn’t like cabbage. I really enjoyed it, so I think it will depend on your fondness for cabbage.

    13/100: Cinnamon Buns – from this recipe. These buns were amazing, so soft and buttery and cinnamony and delicious. The recipe is enormous and I would recommend halving it. It also rises nicely overnight in the fridge, ready to be rolled out and baked in the morning.

    14/100: Beef & Quinoa Meatballs – from this recipe. This is a nice way of disguising quinoa for anyone who isn’t overly fond of it. They don’t really cling together in order to be rolled into balls – it’s more a method of squodging the mixture together. Very delicious, and a little healthier than your average meatball recipe.

    15/100: Sausage & Lentil Soup – adapted from this recipe (and only adapted because we didn’t quite have the right ingredients – I want to try it again and follow it properly). It can be made vegetarian by leaving out the sausage, and I think would still be a lovely soup. As is though, it’s delicious – spicy and filling, although perhaps a bit more suitable for cooler months.

    16/100: Wine Braised Leg of Lamb – from this recipe. It’s a really terrible photo I’ve put on Flickr – in fact, probably best not to click that link. It’ll put you off making it. It’s hard to make hunks of meat look attractive in photos taken on an iphone at night. This was good, lovely and garlicky, but definitely not my favourite braising recipe for lamb.

    17/100: Beef with Garlic & Pepper – adapted from this recipe. When you’re spending half an hour grinding pepper into a bowl (slight exaggeration), it feels like it’s going to be far too much, and yet it just adds a nice warm depth of flavour. This is a lovely easy meal to make in a wok.

  • I read less in 2012 than I have in a long time, for obvious reasons – infants are not conducive to uninterrupted time with a book. 61 books in total – in comparison, I read 85 in 2011, 70 in 2010, 135 in 2009 and 183 in 2008. Apparently you get less free time that you don’t feel the need to do anything but read in as you get older. Who knew.

    Best new authors of the year were KJ Parker and Frances Hardinge. KJ Parker writes vaguely speculative (only in the sense of their time and place) novels which are wonderfully written and generally horrifically depressing. My favourites were The Folding Knife and The Hammer, both the sort of novels where you finish reading and then sit around glowering for a while and contemplating the hopelessness of life. I enjoy books like that, in limited doses. Frances Hardinge, on the other hand, writes fantasy YA novels, and I do wish she would write a novel for adults, because her YA novels are just stunning – gorgeously realised, detailed worlds and the most wonderful use of language. I think I read almost everything she’s published, and my favourite was The Lost Conspiracy.

    Other excellent books of the year – Code Name Verity by Elizabeth Wein, which a book about wartime that will make you weep hysterically (good times, good times), and The Rook by Daniel O’Malley, which is a terrifically exciting (urban? somewhat) fantasy.

    Worst books of the year were the usual selection of dreadful fantasy books, which I should really be more discerning about. Goals for 2013 – to avoid said dreadful fantasy books, to read more books than 2012, and to read some of the books I own that have been sitting unread on my bookshelves for several years.

  • Leaning

    Edward was just over six months old when I started back at work for three days a week – 28 weeks, although I don’t think of his age in weeks anymore. For the first month at least, he’s spending those days with the husband, so I wasn’t nervous in the same way I would have been if I was dropping him off at a daycare for the first time. I was mostly worried about slipping back into the routine of work, and the logistical difficulties of expressing milk.

    After three days of work, I’ve found the transition surprisingly easy. I am sometimes rather impatient during the drive home from the bus station, knowing that I’m about to be greeted with a slowly spreading incredulous smile, followed by mad giggling. (That would be the greeting from the baby, not the husband). But when I’m in the office, or walking through the city, it feels like I’ve slipped seamlessly back into how things were before.

    It’s not seamless, of course. My first night home was an hour of trying to convince a screaming baby to sleep. Expressing is taking me longer and being less productive than I’d like, and going from normal breastfeeding to three consecutive days of expressing is a bit rough on supply and comfort levels. I’m worried I won’t be able to keep up my stores in order to be able to feed him over those three days over an extended period of time. However, despite all that, I’m really enjoying having days back where I can do things uninterrupted from start to finish, take breaks on my schedule instead of a baby’s, being able to wander to a shop to buy something during my lunch break. Having part of my time with only me to think about is incredibly refreshing, even if I am always delighted to get home. That’s something that is hard to imagine prior to having a child, I think – the lack of time to yourself.

    While I have really enjoyed all the months I was able to spend full time with Ted, being alone with a young baby during the day comes along with a fair dose of unavoidable tedium and boredom, and I’m happy to have more to occupy my mind. Plus, time on a bus twice a day with my book – a luxury to be appreciated.

  • I decided not to make resolutions for the new year, and instead decided on a few projects (from small to somewhat ambitious) that I would try and complete in the next twelve months. One of those was making 50 new recipes, with the goal of making different things to my usual recipes – not just 50 cakes, for examples, although a cake has already featured.

    I’m up to 9 recipes so far:

    1/50: Beef Biryani – adapted from a chicken biryani recipe here. I simply used leftover steak instead of chicken, and it was lovely – I’m a fan of one pot meals.

    2/50: Spicy African Chicken Stew – adapted from this recipe. I do wonder how this dish can declare itself to be from an entire continent. Presumably African cuisine varies. It also contains an entire jar of peanut butter, but it does make a rather large quantity – so possibly a bit questionable health-wise, but delicious.

    3/50: Carrot Soup with Tahini & Roasted Chickpeas – from a Smitten Kitchen recipe. This was fantastic – a beautifully spiced soup, but the things I loved most about it was the lemony tang of the tahini mixture, stirred into the soup, and the crispy chickpeas. The roasted chickpeas were amazing, I’m going to make them on their own as a snack when we have guests.

    4/50: Braised Pork Shoulder in Apple Cider – adapted from this recipe, using carrots instead of parsnips. Braising is my new obsession. Talk about transforming cheap cuts of meat. I don’t particularly like pork, but thought it was really transformed by the cider. The Husband: “best pork I have ever eaten”.

    5/50: Pumpkin, Bean & Lentil Stew – from this recipe. This was a lovely spicy stew, and the fig raita, whilst it sounds a bit odd, goes wonderfully with the sweetness of the pumpkin.

    6/50: Braised Leg of Lamb – made from this recipe. I neglected to take a photo of it (not a big loss. Braised meat is not terribly attractive). It was fantastic – sweet and fruity and falling off the bone. The Husband: “This is even better than the pork.”

    7/50: Fig & Prune Bliss Balls. I looked at a few recipes for these, then hurled things into the food processor until they came together. Starting with a cup of almonds, then when they’re pretty well pulverised, adding a cup of figs, a cup of prunes, and half a cup of pepitas. Form into balls, roll in coconut, put in fridge. Tasty little healthy snacks.

    8/50: Honey Cake -from a recipe in The Joy of Cooking (which someone has set out here. Dense and moist, with an intense honey flavour. I’d like to figure out if you could make it sugar free, but I imagine it would make the texture more gingerbread-like.

    9/50: Lentil Salad – adapted from this recipe. It claims to be the best lentil salad ever, and it is pretty damn good. I baulked a bit at the mixture of spices, but it is lovely – spicy and slightly sweet, and the lentils and currants go beautifully together.

  • We have been experiencing a glut of apples recently, as each week we don’t get through the large number in our fruit & vegie box. Making apple cakes and apple pies just doesn’t use up enough of them for my liking, so I made apple sauce instead.

    Apple sauce – or, to be more precise, cooked pureed apple – doesn’t really require a recipe, although if you want you can add cinnamon and lemon juice and all manner of things (like this). I rinsed and cut up apples into large chunks, removing the cores and any spotty bits, until I had filled my large saucepan (around 6 or 7 large apples). Add a cup of water, put the saucepan on the stove to simmer, and ignore it for between 30 to 45 minutes, until the apples are falling apart. Once it’s cooled down a little, I pureed it with a stick blender.

    Some recipes require you to peel the apples, particularly if you’re making baby food – I prefer having the skins on the apples, and it’s less work, so I made sure the apples cooked until the skins were very soft, and was careful to ensure that there were no chunks of skin in the puree.

    Four things to do with apple sauce:

    Apple sauce for babies
    Ted has just started eating solids, so I’ve planned ahead and frozen a few things for future busy days. I spooned the cooled and pureed apples into a large ice cube container. Once the cubes of apple were frozen, I sat the container out for a minute to loosen them, then put the cubes into a zip lock bag, so that we can defrost as many as we need for future meals.

    Granola: crunch, delicious, and rather irresistible for breakfast.

    Apple Sauce Pie: incredibly easy and delicately spiced.

    Spiced Apple Sauce Cake: a lovely moist cake, but to be honest what I really enjoyed about it was how the cream cheese icing went with it.

  • I made this for my 31st birthday this year, because I had plenty of apple sauce, and I love cream cheese icing. You can tell two things about my baking methods from this photo -I can rarely be bothered sifting icing sugar, and I’m lazy about cutting lining paper for cake tins (so I just smoosh a sheet of paper in there without making corners, and it creates creases in the cake). This is a wonderfully moist and gently spiced cake – it lasts well, but should be kept in the fridge because of the icing.

    (adapted from a Smitten Kitchen recipe)

    cake ingredients:

    2 cups plain flour
    2 tsps baking powder
    1/2 tsp bicarb soda
    1/2 tsp salt
    1 tsp cinnamon
    1/2 tsp ground ginger
    1/8 tsp ground cloves
    110 grams unsalted butter, softened
    1 cup packed light brown sugar
    1 tsp vanilla extract
    2 eggs
    1 1/2 cups unsweetened apple sauce

    icing ingredients:
    140 grams cream cheese, room temperature
    3 tablespoons (1 1/2 ounces or 42 grams) unsalted butter, softened
    1/4 teaspoon pure vanilla extract
    1 cup (4 ounces or 120 grams) confectioners sugar
    1/2 (1 teaspoon) teaspoon cinnamon

    Preheat the oven to 180C. Butter and line a 9-inch square cake tin (carelessly or carefully, however you prefer).

    In a small bowl, whisk together the flour, baking powder, bicarb soda, salt and spices until well combined. In a larger bowl, use electric beaters and mix the butter, brown sugar and vanilla until smooth and fluffy. Add the eggs one at a time, beating well after each, then beat in the apple sauce. Using a low speed, beat in the flour until just combined.

    Pour the mixture evenly into your cake tin, and bake for 40 to 45 minutes, until a skewer comes out cleanly. Cook the cake completely before icing.

    While the cake is cooling, beat the cream cheese, butter and vanilla essence with electric beaters until fluffy. Beat in the sugar and cinnamon, and then spread your amazingly smooth (cough cough) icing over the cake. This amount of icing makes an American style thick icing layer, but the cake is quite solid and I think it goes well with a decent amount of icing. This could be my sweet tooth talking, of course.

  • This is such a simple way of making ginger beer in your pantry – it stays relatively well carbonated, and has a lovely bitey gingery taste.

    You will need a clean and empty 2 or 2.25 litre soft drink bottle and a plastic funnel. I used a soda water bottle so I didn’t worry about it retaining other flavours.

    ingredients:
    fresh ginger, enough to grate 2 tablespoons
    1/4 tsp instant yeast (baking yeast)
    1 cup sugar
    juice of half a lemon (or a whole one, depending on how you want the beer to taste)
    tap water (filtered or rain water, preferably)

    Using the funnel, pour the sugar and the yeast into your clean bottle. Shake it around to distribute evenly.

    Grate the ginger on the small cutting teeth side of your grater, so you get fine flakes. Mix in a small bowl with the lemon juice, to make a slurry. Pour into the funnel. Depending on the size of your funnel, you may need to shove the bits of ginger through with a skewer.

    Fill the ginger/lemon bowl with water, and pour into the bottle, then fill it up with water. Leave at least 3-5cm empty. Close the lid tightly. If you squeeze the bottle now, you’ll be able to depress it quite a bit. Pop the bottle in your pantry or another relatively cool spot for between 24 to 48 hours. Keep checking on it and giving it a squeeze – when the bottle is too hard for you to depress, pop it in the fridge overnight.

    The ginger beer is now ready to drink! Take off the lid slowly over the sink, just in case. You’ll probably want to pour each glass through a small strainer in order to remove the larger bits of ginger. Delicious on its own, or with a splash of rum.

    I’m looking forward to tweaking this a little – perhaps adding a bit of vanilla bean, cinnamon stick or chili to the brew.

  • I’ve read quite a few recipes for granola, and never really understood the point of it – is it a breakfast food? A snack? Now that I’ve made it, I realise it’s a bit of both, and an excellent way of using up some of your homemade apple sauce (if you’re like me, and have made mountains of it). It’s like a very crunchy toasted muesli which sticks together in small clumps – excellent for snacking on, sprinkling over yoghurt and eating for breakfast with yoghurt and stewed fruit.

    (Recipe adapted from here, which in turn is adapted from a Nigella Lawson recipe)

    ingredients:
    5 cups rolled oats
    3 cups almonds, coarsely chopped
    1 cup sunflower seeds
    1/2 cup brown sugar
    2 teaspoons cinnamon
    1 teaspoon ginger
    1 teaspoon sea salt
    3/4 cup homemade apple sauce (or other unsweetened apple sauce)
    1/3 cup golden syrup or treacle (or honey if you don’t have either)
    1/4 cup honey
    2 tablespoons rice bran oil or other vegetable oil

    Preheat the oven to 150C. In a large bowl, stir together all the dry ingredients. Heat up the apple sauce, treacle, honey and oil in a small saucepan until warm, then pour into the dry ingredients. Quickly stir together until everything is evenly coated with the apple sauce mixture.

    Roughly line two large baking trays with baking paper (by which I mean, put lengths of baking paper over the trays and don’t bother to stick them on with butter), and spoon half the mixture onto each tray, spreading it out evenly and pressing it down firmly with the back of your spoon. Put the trays into the oven for 45 minutes, opening up and stirring around the granola twice during the baking process.

    Let the granola cool, and store it in air tight containers, easily accessible for snacking purposes – it will be deep brown, with some clumps, and deliciously crunchy.

  • This is a beautifully simple pie, ridiculously easy to put together, and has a spicy apple-custard-ish flavour. You’ll need to make a pie crust (or use store-bought pastry) – I used Smitten Kitchen’s recipe, as I’m going through and making things from her new cookbook. (Pie recipe adapted from here).

    ingredients:
    pastry for a single pie
    2 eggs
    1/2 cup brown sugar
    2 tablespoons flour
    1 teaspoon cinnamon
    1/2 teaspoon nutmeg
    1/2 cup butter, melted
    1 cup unsweetened apple sauce
    1 teaspoon vanilla extract

    Preheat the oven to 180C, and roll out your pastry into a greased pie tin.

    In a large bowl, whisk together the eggs, brown sugar, flour and spices, then whisk in the melted butter, apple sauce and vanilla. Pour the filling into the pie tin, and bake for about 40 minutes until brown and set.

    See! How could that be any simpler?